T
TLDRMoney
Guest
How to Setup and Optimize Native Ad Campaigns on Revcontent
This will be PART #2 of the tutorial. In this section we will outline the process for creating a campaign and configuring your tracking platform to receive the necessary data for optimization.
Section 2 - Creating a campaign and configuring your tracking platform
For the purpose of this tutorial we will be using CPVLab to track our campaign performance. You will also need to create an account at Revcontent.com. This section assumes you already have CPVLab installed on a domain.
If you need help with this process, check out my tutorial:
"How to Setup a Campaign From Scratch - Using CPV Lab"
You need to decide on a campaign that you wish to test. You also need to setup your landing pages if you are not direct linking your offer. Make sure to have on hand the following items:
-Ad images
-Headlines/Ad text
Let's start by logging into Revcontent.
STEP 1
Go to "Revcontent.com" and login to your account. Create an account if you don't already have one.

STEP 2
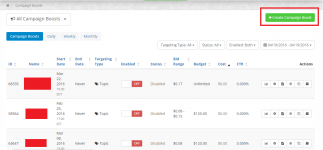
Click on 'Campaign Boosts' at the top of the page.

STEP 3
Click the 'Create Campaign Boost' button at the top of the page.

STEP 4A
Let's break down each of the fields under the 'Basic Info' Section.
A - Boost Name - Enter a name for your Campaign/Boost
B - Default CPC - Choose a default 'Cost Per Click' for your campaign. This is the Max you are willing to pay per click. From my experience, choosing a default CPC of $0.10 is sufficient for a new campaign. This will change later.
C - Budget Amount - Choose 'Unlimited' if you have an unlimited budget for testing. Choose 'Daily' if you have a fixed budget. Sometimes it is not wise to burn through your budget all in one day. Some campaigns perform better on different days of the week and also at different times of the day.
D - Optimize For - Choose 'CPA ROI'. This will allow us to setup a 'Conversion Pixel' to track our performance. Check the next step below for instructions and screenshots

STEP 4B
Click on the '+ Create Conversion Pixel' button. Enter the information below and click the 'Create Conversion Pixel' button.
A - Name - Enter a name for your pixel
B - Amount - Enter the payout given for the CPA offer that you are promoting

Copy the img conversion pixel below and paste in notepad for future steps. Click 'All Set, Close This Form'

STEP 4C
Let's break down each of the fields under the 'Scheduling' and 'Targeting' Sections.
A - Start Date - Enter a start date for your campaign
B - End Date - Enter an end date for your campaign
C - Targeting Type - For a basic CPA campaign and a complete test, select 'Topic Targeting'
D - Topic Targeting - For a complete test, select 'All Topics'
E - Country Targeting - Enter the Country/Geo location(s) accepted by your CPA offer.
F - Device Targeting - For a complete test, Select All Devices. You may want to change this later if you find some devices have poor performance.
G - Language Targeting - This will be determined based on what Geo/Country you are targeting. Some European countries have diverse populations that speak different languages. If your targeted Geo/Country does not have a clear language majority, you may want to select a specific language. Since I've selected 'United States', I will leave this as default.

STEP 4D
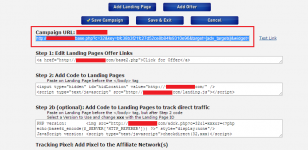
Let's break down the 'Tracking' Section. This is a very important section for future optimization. Click the 'Gear' icon on the right side of the Tracking code field.

For this tutorial campaign, we will cover the basics and essential data to optimize. Scroll down the the bottom of this section. Be sure to check the three boxes highlighted below. Click 'Build Tracking Code'.

Copy the tracking code and paste into notepad for future steps. Click the 'Save' button at the bottom of the page.

STEP 5A
On the next page we will need to add some content. Revcontent defines content as Ad text and Images. Let's start by entering a 'Destination URL'. This will be the URL for our landing page/Offer page. For this step, add a random URL like 'google.com'. We will update this later once we get our URL from our tracking platform in future steps. Click the 'Submit' button.

STEP 5B
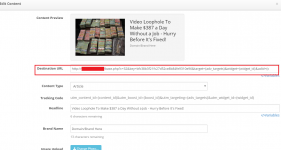
Let's break down each of the fields for the content section.
A - Content Preview - This will be your generated preview of how you Ad will appear on pages
B - Destination URL - This is the URL for your Landing Page/Offer Page. We will update this later.
C - Content Type - Let's keep this set to Article for the purpose of this tutorial.
D - Headline - Enter a headline for your ad.
E - Brand Name - This is the name or brand that will appear at the bottom of your ad.
F - Image Upload - Upload an ad image relevant to your campaign

Once complete and satisfied with your ad copy, click the 'submit' button at the bottom of the page.
PROTIP: You have access to a 'variable' menu on the right hand side of your 'Headline' field. You can enter these variables to help personalize your ads to specific locations of your visitors.
Example: 'Find Out How People In {CITY} Are Making $634 Everyday'

STEP 6
Once you have submitted your content, your ad will be set to a 'pending' status for approval. This can take up to 3 business days to get approved. I suggest contacting your Revcontent rep. They can help speed up this process. I suggest submitting a minimum of 4 separate ads with various headlines and images for testing. Too many might spread your data thin depending on your budget. Keep that in mind before submitting more than 4 ads in the beginning phase. To submit more ads, click the '+Content' button at the top right hand side of the page. Repeat these steps until you have submitted all of your content/ads.

STEP 7
In this step we are going to configure our tracking platform to pass the required data to run a proper test. I will be using CPVLab for this tutorial. You will need to pass a minimum of three pieces of data for each visitor. In STEP 4D we copied a tracking code that looked something like this:
utm_content_id={content_id}&utm_boost_id={boost_id }&utm_targeting={adv_targets}&utm_widget_id={widge t_id}
The three key elements that are vital for optimization:
{content_id} - This will tell us which Ad our visitor clicked.
{adv_targets} - This will tell us the category/niche of the website in which the visitor found your Ad.
{widget_id} - This will tell us which widget on the website served our Ad.
These are very powerful pieces of information for optimization and are essential to your success on Revcontent. Configuring your tracking platform predefined source values is beyond the scope of this tutorial. This is how it should look in CPVLab.

STEP 8
After adding these variables/tokens to your tracking platform, they should append to your campaign link. Your campaign link should look something like this:
http://domain.com/base.php?c=32&key=bfc38b3f21fc27d52ce8b84fe9310e96 &target={adv_targets}&widget={widget_id}&adid={con tent_id}
In CPVLab you will find your campaign link under 'Campaign URL:' at the bottom of the page. Copy this URL.

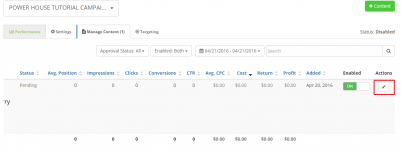
STEP 9
Go back to your Revcontent campaign and click the 'Pencil' icon on the far right hand side of your pending content.

STEP 10
Paste the URL that you copied in STEP 8 into the 'Destination URL' field, replacing 'google.com' that you entered earlier. Click the 'Submit' button at the bottom of the page. Be sure to repeat this step for each one of the content/ads.

PROTIP: If you would like to confirm that your tracking platform will accept the data passed on this URL, populate each of the variables/tokens with real information and browse to your campaign URL via your internet browser.
Example:
http://Domain.com/base.php?c=32&key=...ng&adid=Tester
Result:

At this point you need to wait for your content/ads to be approved. It's always a wise idea to pause your campaign in Revcontent until your ad is approved. This prevents traffic from starting while you are away or sleeping, which can kill your budget on non-converting widgets. Below is an example of what real time data will look like in CPVLab.
'Social and Trending - Right Rail' was passed through on {adv_targets}
'17611' was passed through on {widget_id}

If you need some ideas for a campaign, I suggest the following as I have seen them frequently on Revcontent.
Brain Supplements - Trial and Straight Sale
Tactical Flashlights - Straight Sale
Bizop Millionaire System - LeadGen and Email Submit
Testosterone Supplements - Trial and Straight Sale
Diet Supplements - Trial and Straight Sale
Skin Care Supplements - Trial and Straight Sale
Diabetes Treatment - LeadGen
Erectile Dysfunction - LeadGen and Video Sale
Senior Dating 50+ - LeadGen and Trial
If have any issues locating these offers, feel free to contact me and I will make an introduction with an advertiser to get you started.
This concludes PART #2 of the tutorial. Stay tuned for the next section which will cover how to manage your data, blacklist widgets, optimize your campaign and create a whitelist.